Monday, May 30, 2011

Fiber Arts Fiesta--The Booth


Welcome to the Albuquerque Chapter of the American Sewing Guild’s Fiber Arts Fiesta Booth

For the last several days my life has been consumed with a little thing known as Fiber Arts Fiesta—a international textile show which features vendors, judged entries and charity fundraisers.

This year I was in charge of the Sewing Guild’s entries and arranging them in a pleasing exhibit.

So come on in and take a peak at the booth!


We had volunteers come man the booth and recruit new members.


All the entries we received were on display and I had the challenge of arranging them so they were all showcased at their best.


And there you have it.

Happy Fiber Arts Fiesta
~Melisa & Cordelia

Tuesday, May 24, 2011

Fiber Arts Fiesta

For those of you who don't know, Cordelia and I have been up to our eyeballs in Fiber Arts Fiesta.

"But what is this Fiber Arts Fiesta?" You may be asking yourself, especially if you are not from the Albuquerque aria.


 Well, it's a show dedicated to fiber arts education and to the display of fiber-related artwork. It is hosted by 17 co-sponsoring New Mexico fiber arts guilds and includes both juried and judged works or art.
The 2011 Fiesta received 632 exhibit entry applications from all over the world (the quilters had one from Taiwan) and will host 70 vendors. 

The show hosts vendors, fashion shows, guild and vendor demos, classes and workshops, educational exhibits and a solo show by Featured Artist Arley Berryhill and a fundraiser--The Giving Tree.

The show is to take place on Thursday May 26th, Friday May 27th and Saturday May 28th at the Manual Lujan Complex located on the State Fair Grounds.

This year I am in charge of the Sewing Guild booth and entries, the fashion shows and the vendor demos, so as you can imagine it's been keeping me busy! If you happen to be in the aria you should stop by the show and give me a shout out cause I sure would love to see you!

Happy Fiber Arts
~Melisa & Cordelia

Sunday, May 22, 2011

Birdy Skirt


Sometimes you never know when Inspiration is going to hit, and the other day as I was walking through the home decor department at Target, Inspiration hit me right smack in the left eye in the form of a shower curtain.


I couldn’t resist the sweet little birds printed on the fabric, so I bought the curtain, got it into my studio and worked a little sewing magic and ended up with this a-lined skirt.

I gave it a waist yoke to make the skirt extremely wearable for both casual and slightly dressier occasions.


The shower curtain fabric needed a little support, so I lined the skirt with an old bed sheet, and let me tell you, this sucker is as soft as a pool full of marshmallows. Wearing it is like walking through a cloud. Yum!

Oh, and I added a little ribbon to the hem to make it purty.


I wanted to add a little more detail to the skirt, so I used some rick-rack to finish of the hem.


But the best part?
I had enough fabric left over that I was able to make a little curtain for my new studio window.


But even better than that?
I used the button holes that were already there (cause it was a shower curtain) to run the curtain through my curtain rod, which means all I had to do was hem the thing.
Talk about easy!
 Now those are my kind of projects!

Happy Sewing!
~Melisa & Cordelia


Friday, May 20, 2011

Know Your Seamfinishes--Hong Kong

Welcome to a little segment I like to call "Know You Seamfinishes" where I like to share some of the different ways you can finish a seam so your fabric does not ravel on you.

I'm all about making the insides of my garments look just as good as the outside, so I am especially fond of the Hong Kong seam finish as it is a really cool way to add a bit of contrasting fabric to the inside!

This is a good choice for heavy fabrics or fabrics that fray excessively. It is attractive and is a good choice for seams that will be visible such as those in an unlined jacket.

Put right sides of the fabric together, sew a 5/8” seam and press open.
Cut 1” wide bias tape (you can use the purchased stuff if you want).
With right sides together, line up the bias tape with the edge of one seam allowance.
Stitch ¼” from the edge. Be careful not to stretch the bias tape much or it will become too narrow.
Fold the bias tape out and press.
Wrap the bias tape around the seam and press.
Stitch in the ditch to hold the bias tape in place. Trim the unfinished edge of the bias if necessary.
Repeat for the other side of the seam.

 
I promis, it's way easy to do and is totally woth the extra time!!!
 
Happy Seamfinishing
~Melisa & Cordelia

Wednesday, May 18, 2011

How to Gather Over a Cord/ Finishing the T-shirt Dress


Yesterday I started to show you how to make a gathered dress for a little girl from an old t-shirt, but then I got tired so I quit.

Well today Cordelia and I are back to finish up thee tutorial and you should probably pay attention—at least to the first bit—because I’m going to share a really cool trick with you today that I just know you are going to love, love, love, LOVE!!!!

So yesterday we cut the dress out and sewed and hemmed the skirt.
Today we will start with gathering the skirt.

Those of you who have ever gathered anything before are probably moaning to yourself right now…
“Ewww….Gathering….I HATE gathering. It’s such a pain…”

Well I’m here to show you an easy peasy, fool proof gathering technique you will adore.
Forget those basting stitches, we are going to gather over a cord.

Here’s how you gather over a cord.

Step 1:
Find a cord to gather over. This can be any kind of thin inexpensive cord—just make sure it’s strong or it will break on you and then you will get frustrated. I like to use crochet thread or a heavy hand quilting thread.


Step 2:

Cut a strand of thread the length of the item to be gathered, or, to help prevent tangles, put the spool of thread on your knee-lift if you have one.


Step 3:

If you use a Bernina, I suggest using a #6 foot which has a small hole in the front of it. Put the thread through the hole to help keep it in place. If you do not have a Bernina, or the # 6 foot, you can use your regular foot, you’ll just have to pay a little closer attention.

Step 4:

Place the thread on the wrong side of the fabric in the seam allowance (I usually line up the edge of my presser foot with the edge of the fabric). Select a Zigzag stitch and set the width and length to about 2.5 mm. Sew the zigzag stitch right over the cord making a tunnel.


Step 5:

Continue sewing the zigzag stitch all the way around the fabric to be gathered down.
Clip the sewing threads but not the cord to be gathered over.
Pull on the cord ends to gather up the fabric.
See how easily this gathers up! So smooth, so easy, no broken threads!


Step 6:

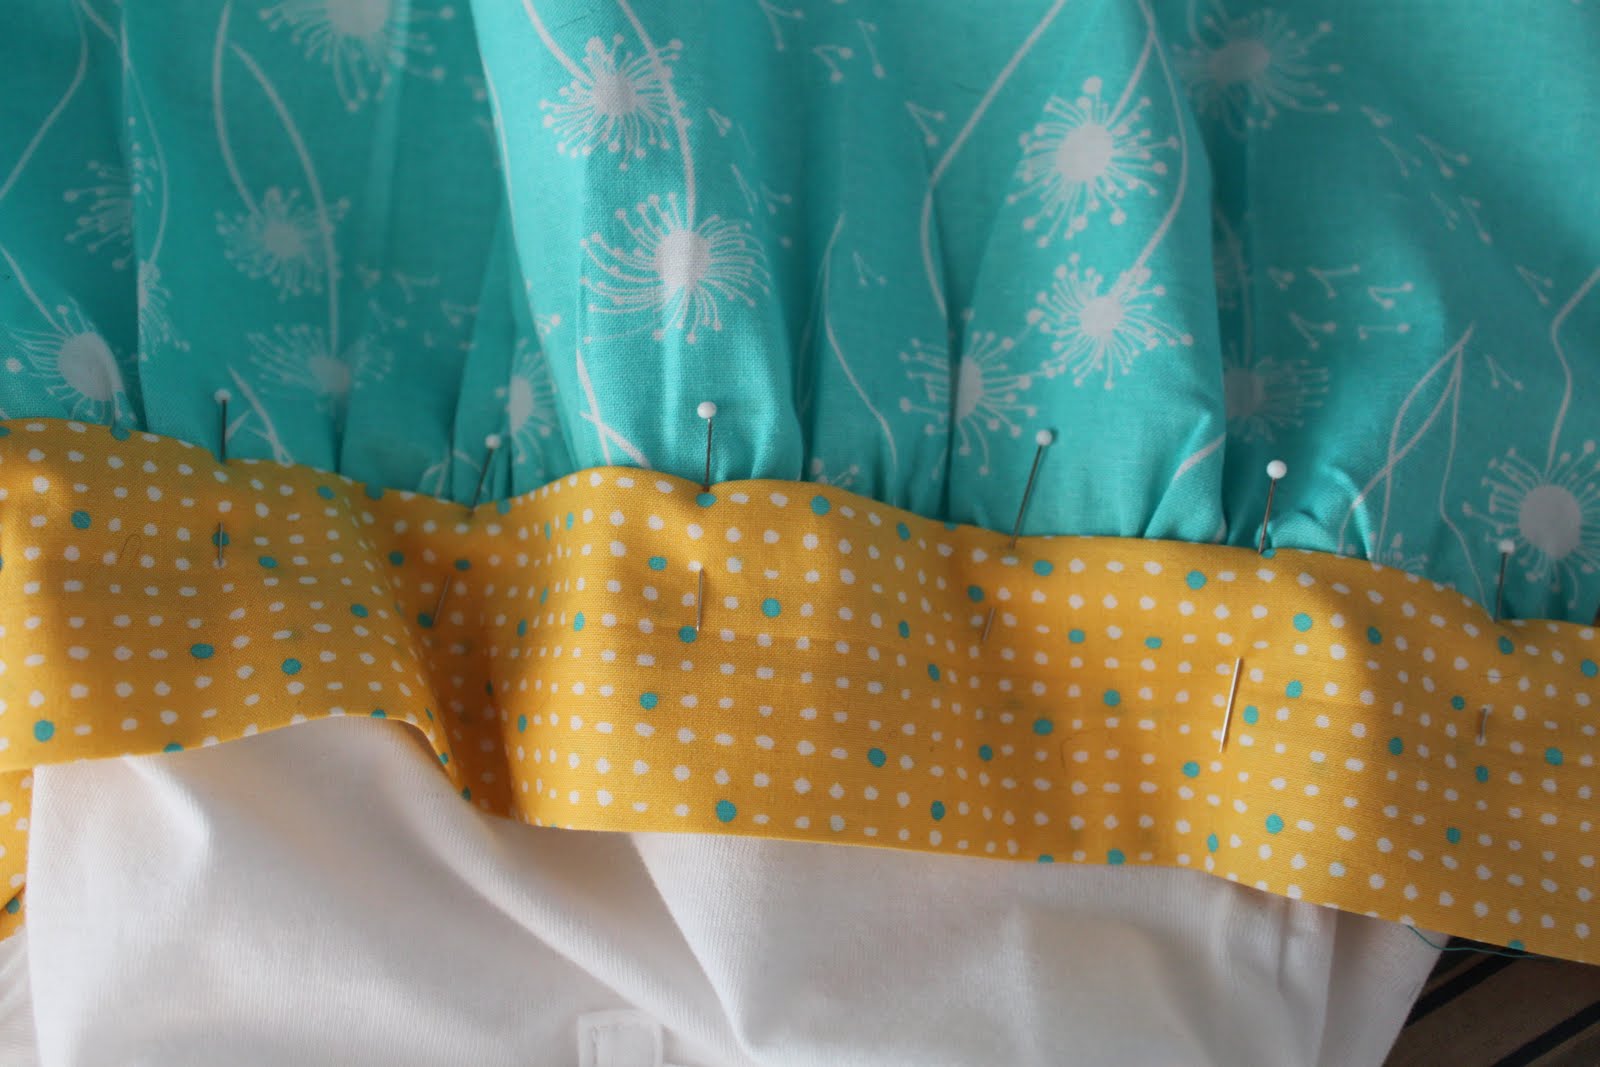
Gather the fabric up until the skirt circumference is the same as the t-shirt circumference.
Pin the skirt to the t-shirt making sure to evenly distribute the gathers and fullness.

Sew the skirt to the t-shirt with a ½” seam allowance.
I like to finish this seam with a surged or zigzagged stitch.


!!!!Important note: You will be working with a knit fabric and a woven fabric so I recommend using a universal needle! It’ll work great with both types of fabric!!!!

Whew, now that we got through the dreaded gathering, it’s time to make the waist tie.

Start by sewing the two strips together, with right sides together, along the short ends. Press the seam open. With right sides together, fold the strip in half lengthwise.


With a ½” seam allowance sew the long seam.
Press open.


Use a safety pin to turn the tube right side out.


Press so the seam runs down the center of the tube. This will become the back side of the tie.


Lay the tie on top of the dress where you want it to hit. I like to line up the seam of the tie with one of the side seams of the dress.

Pin in place.
Edge-stitch the top and bottom edges of the tie to hold in place. You only need to sew from side seam to side seam across the front of the dress. Do not sew the back down.


Tie a bow to determine how long you want the ties to be. Trim off the excessive length. Finish the raw edges by folding them in and edge-stitching along the short sides.


And there you have it!

Check out this little t-shirt dress a student made. Aren’t you impressed with how she lined up the monkey fabric on the tie?


Happy Wednesday
~Melisa & Cordelia


Tuesday, May 17, 2011

How to Make Your own Gathered T-Shirt Dress Part Uno


As you may recall, Cordelia and I have been recycling little girl t-shirts into little girl dresses.


I’ve also taught a few classes on how to make the dress, and had some amazingly talented students show up who made dresses that look like this.


Well today I thought I would show you how to make your own gathered t-shirt dress.
Are you excited?!
Let's get sewing!

First you will need to select a few supplies.
You will need:

1. A t-shirt that fits the child
2. One to 1 ½ yards of the skirt fabric
3. ¼ yard of the sash fabric.
4. Basic sewing tools.

Now that you have assembled all the ingredients, it’s time to get cutting!

First you will chop off the excessive length of the t-shirt. The easiest way to determine how much to take off is to put the shirt on the child, decide where you want the waist of the skirt to hit, and mark this location.

Add ½ inch of length for seam allowance and chop off everything below this mark.


To cut the fabric, determine the length of the shirt by measuring the child from the waistline to where you want the hem to finish.

Add ½ inch for the waist seam allowance and 1 inch for the hem allowance. This will be the length you need to cut the skirt fabric.

Unless you want an especially full skirt, or are making a dress for an older girl, I make the skirt piece 45 inches wide.

So, cut or tear a rectangle of the skirt fabric the length you decided you need by 45 inches wide.


For the waist tie, determine how wide you want it to be. I made mine to finish 2”. Double this measurement and add 1” for seam allowances. Cut 2 strips this wide (5” for my tie) by 45” long.

Now it’s time to start sewing the skirt!

First place right sides of the skirt together and sew the center back seam (unless you have two skirt pieces then you have 2 side seams). If working with one piece, this means you are sewing the selvages of the fabric together.


Finish this seam by surging, sewing a zigzag stitch near the edge or pinking it.

Now sew the hem.
If your fabric is directional--meaning it has a top and a bottom, make sure you hem the bottom edge!

Fold up the bottom edge ½” and press.

Now fold up a second ½” and press.


Sew next to this folded edge to secure the hem.
If you have it, this is a great place to use your edgestitch foot or # 10 foot for my fellow Bernina sewers.
Just line up the guide of the foot with the fold of the fabric and move the needle to the left,  You'll get a perfectly straight stitch every time!

Be sure to check back tomorrow cause I’ll be showing you how to finish the dress—I’m also going to show you a super nifty gathering technique I think you are going to want to see!


Happy Sewing
~Melisa & Cordelia